
OPQ Cloud Installation
OPQ Cloud currently consists of six services: OPQ Makai (for triggering and collecting power quality data from boxes), OPQ Mauka (for analysis and classification of power quality data), OPQ View (for data visualization and system management), OPQ Health (for monitoring boxes and services), OPQ Box Updater (for over-the-air updates to the Box software), and MongoDB (the backend database system).
We utilize Docker to manage the installation of each of these OPQ Cloud services.
We publish official Docker images for all of these services to the Open Power Quality organization at DockerHub.
Note: OPQ Cloud can currently be installed only on Unix (Macintosh and Linux) systems.
Initial installation
Install Docker and Docker Compose
The first step in installing OPQ Cloud is to install Docker and Docker Compose on your production system.
Please consult the Docker installation documentation and the Docker Compose installation documentation for instructions.
Download opq-docker repo
Next, download the OPQ Docker GitHub repository.
You can either download it as a zip file and uncompress it to create a local directory named "opq-docker-master", or clone it from GitHub with git clone https://github.com/openpowerquality/opq-docker.git - which will create a local directory named "opq-docker".
The advantage to the latter approach is that if we make updates to the files, you can get the changes easily by pulling them from GitHub. Otherwise, you have to download a new zip file and migrate your changes into it.
Edit config files
Your local opq-docker directory contains a subdirectory called "sample-config" containing a set of configuration files for each of the services.
These sample configuration files provide the recommended default values for most configuration variables that are appropriate for normal installations. As the directory name implies, the "sample-config" files are just a set of recommended default configuration files.
Create config dir
In order for OPQ Cloud to deploy successfully, it expects to find these files in a directory named "config" - which you will need to create yourself for your OPQ Cloud installation.
Change into the top-level directory and copy all the default configuration files by invoking:
mkdir config
cp -R sample-config/* config
Edit view.config.json file
While we recommend initially using the default values provided by our sample configuration files, there is one configuration file that you must modify in order to create an initial OPQ Cloud user: view.config.json.
Change into the config/view directory and edit the view.config.json file.
Look for a section called "userProfiles", which has one entry with all blank fields. You will want to fill out the "username" field with an email address of an admin at your site (for example, "johnson@hawaii.edu"), provide a password (for example, "6ydhdk3ac!"), a first name (for example, "Philip"), last name (for example, "Johnson"), and role (which should be "admin").
Bring up services
Now, cd into the top-level directory, where you should find a script called docker-compose-run.sh. To make it executable, invoke:
chmod 775 docker-compose-run.sh
Invoke it with:
./docker-compose-run.sh
This will download all the latest official public images for each of the OPQ Cloud services, and run them. The output should look like this:
$ ./docker-compose-run.sh
Creating network "opq-docker_default" with the default driver
Pulling mongo (mongo:4.0.5)...
4.0.5: Pulling from library/mongo
7b722c1070cd: Pull complete
5fbf74db61f1: Pull complete
ed41cb72e5c9: Pull complete
7ea47a67709e: Pull complete
778aebe6fb26: Pull complete
3b4b1e0b80ed: Pull complete
844ccc42fe76: Pull complete
eab01fe8ebf8: Pull complete
e5758d5381b1: Pull complete
a795f1f35522: Pull complete
67bc6388d1cd: Pull complete
89b55f4f3473: Pull complete
10886b20b4fc: Pull complete
Pulling view (openpowerquality/view:1.0.0)...
1.0.0: Pulling from openpowerquality/view
f189db1b88b3: Pull complete
3d06cf2f1b5e: Pull complete
687ebdda822c: Pull complete
99119ca3f34e: Pull complete
e771d6006054: Pull complete
b0cc28d0be2c: Pull complete
9bbe77ca0944: Pull complete
75f7d70e2d07: Pull complete
f70d7ef53f76: Pull complete
596c5fb5e7e7: Pull complete
cafea2ea58df: Pull complete
Pulling makai (openpowerquality/makai:1.0.1)...
1.0.1: Pulling from openpowerquality/makai
ae11a5913a58: Pull complete
3ce739f90f20: Pull complete
6b2875055ebc: Pull complete
d107d79a2a01: Pull complete
b0fc967adfd7: Pull complete
408db9a181c3: Pull complete
2d749b78ede9: Pull complete
37e94afe8a77: Pull complete
6328efdc5f7c: Pull complete
db943cd8d815: Pull complete
f446b20f5e29: Pull complete
290291559557: Pull complete
3c06c7f85116: Pull complete
3f10433be88d: Pull complete
Pulling mauka (openpowerquality/mauka:1.0.1)...
1.0.1: Pulling from openpowerquality/mauka
6c40cc604d8e: Pull complete
eb28c72fd5c9: Pull complete
8b7b7e8a3ec6: Pull complete
07400c149ca6: Pull complete
93b52b0b4673: Pull complete
d3bbba19a0da: Pull complete
7bb2c64cc517: Pull complete
59a0d300c126: Pull complete
3653218ed311: Pull complete
ed0160d19280: Pull complete
fe748bad2346: Pull complete
Pulling health (openpowerquality/health:1.0.1)...
1.0.1: Pulling from openpowerquality/health
741437d97401: Pull complete
34d8874714d7: Pull complete
0a108aa26679: Pull complete
7f0334c36886: Pull complete
65c95cb8b3be: Pull complete
9107d7193263: Pull complete
dd6f212ec984: Pull complete
43288b101abf: Pull complete
f68aede0db03: Pull complete
3d7e15d338f3: Pull complete
1267bc468955: Pull complete
Pulling boxupdateserver (openpowerquality/box-update-server:1.0.0)...
1.0.0: Pulling from openpowerquality/box-update-server
48ecbb6b270e: Pull complete
692f29ee68fa: Pull complete
6439819450d1: Pull complete
3c7be240f7bf: Pull complete
ca4b349df8ed: Pull complete
19ba2260209e: Pull complete
cdd4562c6eb9: Pull complete
Creating opq-docker_mongo_1           ... done
Creating opq-docker_boxupdateserver_1 ... done
Creating opq-docker_view_1            ... done
Creating opq-docker_makai_1           ... done
Creating opq-docker_mauka_1           ... done
Creating opq-docker_health_1          ... done
Verify installation
Invoke the docker ps command to verify that all OPQ Cloud containers are running. It should look similar to this:
$ docker ps
CONTAINER ID        IMAGE                                      COMMAND                  CREATED             STATUS              PORTS                                                                                                   NAMES
bfbca049f966        openpowerquality/health:1.0.1              "python3 -u health.py"   12 minutes ago      Up 12 minutes                                                                                                               opq-docker_health_1
f45a12252235        openpowerquality/mauka:1.0.1               "python3 mauka/opq_m…"   12 minutes ago      Up 12 minutes       8911/tcp, 9881/tcp, 9884/tcp, 0.0.0.0:9882-9883->9882-9883/tcp, 9899/tcp, 0.0.0.0:12000->12000/tcp      opq-docker_mauka_1
1a328b646393        openpowerquality/makai:1.0.1               "/bin/bash /build/bi…"   12 minutes ago      Up 12 minutes       0.0.0.0:8194->8194/tcp, 0.0.0.0:8196->8196/tcp, 8080/tcp, 9899/tcp, 10000/tcp, 0.0.0.0:9880->9880/tcp   opq-docker_makai_1
4c5d586b6dc7        openpowerquality/view:1.0.0                "node main.js"           12 minutes ago      Up 12 minutes       0.0.0.0:8888->8888/tcp                                                                                  opq-docker_view_1
31102b7a08f4        openpowerquality/box-update-server:1.0.0   "python3 box_update_…"   12 minutes ago      Up 12 minutes       0.0.0.0:8151->8151/tcp                                                                                  opq-docker_boxupdateserver_1
8f7f92bf2a56        mongo:4.0.5                                "docker-entrypoint.s…"   12 minutes ago      Up 12 minutes       127.0.0.1:27017->27017/tcp                                                                              opq-docker_mongo_1
In addition, you should also check the OPQ View service by opening up your web browser and going to http://localhost:8888. You should see the landing page of OPQ View, and the System Health panel should show that all services have been contacted and appear to be functional:

(Note: this image should be replaced with one that more accurately reflects what a "fresh" OPQ Cloud instance should look like.)
Define users, boxes, locations
To complete your installation, you will want to define additional OPQ View users, as well as OPQ Boxes and Locations. To do this, you can login to your OPQ View service with your admin username and password, and then use its interface to complete your installation.
See the OPQ View documentation for details on this step.
HTTPS Setup
Although the OPQ View application is available over HTTP on port 8888, with a few simple steps, you can easily request SSL certificates for your domain (from Let's Encrypt) and have your application running over HTTPS instead.
As part of your OPQ Cloud installation, we include the nginx and certbot services to handle the legwork of setting
up HTTPS. More specifically, an Nginx web server on port 80 is automatically configured to forward HTTP traffic to an
HTTPS web server on port 443, which subsequently reverse proxies traffic to the OPQ View application on port 8888.
As such, please make sure that your host machine has port 80 and 443 open to the outside world. It is also recommended that you setup a firewall on port 8888 once you have HTTPS up and running - otherwise the View application will still be accessible over HTTP on port 8888.
Modify the nginx.env configuration file
To begin, you will need to modify some of the configuration variables in the opq-docker/config/nginx/nginx.env file.
This configuration file should have already been copied over from the sample-config directory earlier during the OPQ
Cloud setup process.
This file contains a few variables that you will need to modify. It looks like this:
NGINX_SERVER_NAME=example.org
LETSENCRYPT_EMAIL=user@example.org
LETSENCRYPT_STAGING_MODE=1
Modify the NGINX_SERVER_NAME variable with the domain name pointing to your host machine.
Then, modify the LETSENCRYPT_EMAIL variable with an email address that should be associated with the SSL certificate
generated for the given domain name.
Leave the LETSENCRYPT_STAGING_MODE variable set to 1 for the time being. This will ensure that you do not hit any
certificate request limit while testing your HTTPS configuration.
Your nginx.env file should now look something like this:
NGINX_SERVER_NAME=emilia.ics.hawaii.edu
LETSENCRYPT_EMAIL=admin@openpowerquality.org
LETSENCRYPT_STAGING_MODE=1
Perform a test run with LETSENCRYPT_STAGING_MODE = 1
Before we begin, ensure that all OPQ Cloud services are shut down by changing into the opq-docker directory and
invoking docker-compose down.
Then, invoke the init-letsencrypt.sh script and follow the prompts. It should look something like this:
opquser@emilia:~/opq-docker$ ./init-letsencrypt.sh
Existing data found for emilia.ics.hawaii.edu. Continue and replace existing certificate? (y/N) y
### Creating dummy certificate for emilia.ics.hawaii.edu ...
WARNING: The NGINX_SERVER_NAME variable is not set. Defaulting to a blank string.
Creating network "opq-docker_default" with the default driver
Creating opq-docker_boxupdateserver_1 ... done
Creating opq-mongo                    ... done
Creating opq-docker_view_1            ... done
Creating opq-docker_nginx_1           ... done
Generating a RSA private key
........................+++++
............+++++
writing new private key to '/etc/letsencrypt/live/emilia.ics.hawaii.edu/privkey.pem'
-----

### Starting nginx ...
WARNING: The NGINX_SERVER_NAME variable is not set. Defaulting to a blank string.
Stopping opq-docker_view_1            ... done
Stopping opq-mongo                    ... done
Stopping opq-docker_boxupdateserver_1 ... done
Removing opq-docker_nginx_1           ... done
Removing opq-docker_view_1            ... done
Removing opq-mongo                    ... done
Removing opq-docker_boxupdateserver_1 ... done
Removing network opq-docker_default
Creating network "opq-docker_default" with the default driver
Creating opq-mongo                    ... done
Creating opq-docker_boxupdateserver_1 ... done
Creating opq-docker_view_1            ... done
Creating opq-docker_makai_1           ... done
Creating opq-docker_nginx_1           ... done
Creating opq-docker_mauka_1           ... done
Creating opq-docker_certbot_1         ... done
Creating opq-docker_health_1          ... done

### Deleting dummy certificate for emilia.ics.hawaii.edu ...
Starting opq-docker_boxupdateserver_1 ... done
Starting opq-mongo                    ... done
Starting opq-docker_view_1            ... done
Starting opq-docker_nginx_1           ... done

### Requesting Let's Encrypt certificate for emilia.ics.hawaii.edu ...
Starting opq-docker_boxupdateserver_1 ... done
Starting opq-mongo                    ... done
Starting opq-docker_view_1            ... done
Starting opq-docker_nginx_1           ... done
Saving debug log to /var/log/letsencrypt/letsencrypt.log
Plugins selected: Authenticator webroot, Installer None

- - - - - - - - - - - - - - - - - - - - - - - - - - - - - - - - - - - - - - - -
Would you be willing to share your email address with the Electronic Frontier
Foundation, a founding partner of the Let's Encrypt project and the non-profit
organization that develops Certbot? We'd like to send you email about our work
encrypting the web, EFF news, campaigns, and ways to support digital freedom.
- - - - - - - - - - - - - - - - - - - - - - - - - - - - - - - - - - - - - - - -
(Y)es/(N)o: Y
Obtaining a new certificate
Performing the following challenges:
http-01 challenge for emilia.ics.hawaii.edu
Using the webroot path /var/www/certbot for all unmatched domains.
Waiting for verification...
Cleaning up challenges

IMPORTANT NOTES:
 - Congratulations! Your certificate and chain have been saved at:
   /etc/letsencrypt/live/emilia.ics.hawaii.edu/fullchain.pem
   Your key file has been saved at:
   /etc/letsencrypt/live/emilia.ics.hawaii.edu/privkey.pem
   Your cert will expire on 2019-06-29. To obtain a new or tweaked
   version of this certificate in the future, simply run certbot
   again. To non-interactively renew *all* of your certificates, run
   "certbot renew"

### Reloading nginx ...
2019/03/31 21:58:34 [notice] 10#10: signal process started
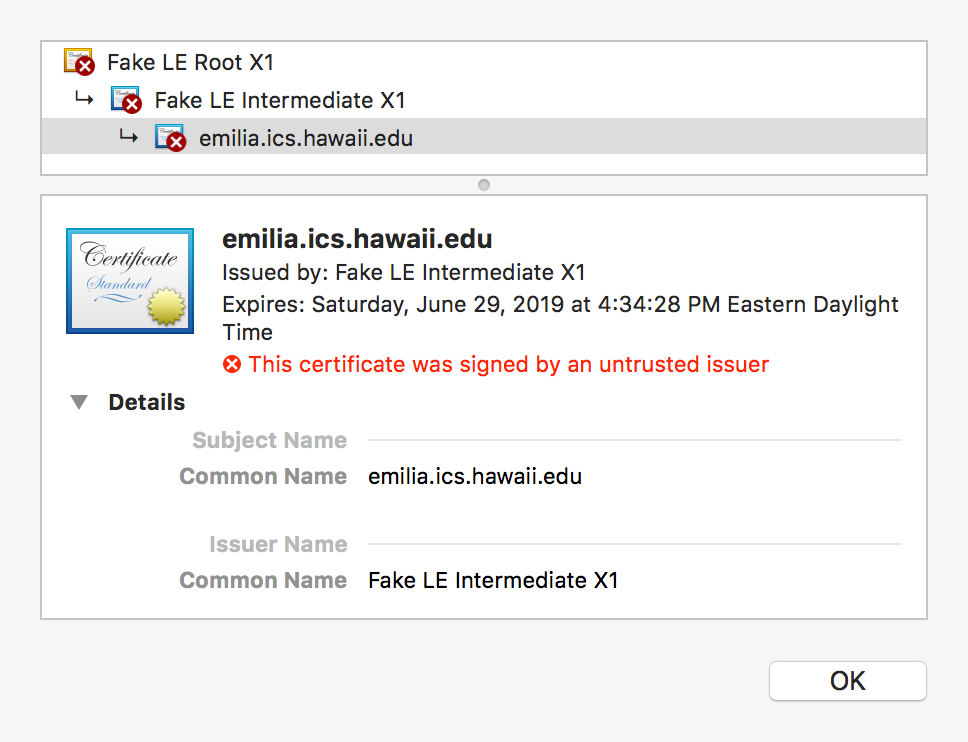
Now, verify that the (fake) SSL certificate was properly generated by opening up your web browser and visiting your View application at the domain name that you specified. Each web browser application should have a way to display the SSL certificates of the web site being visited. On Chrome, it should look similar to this:
Request real SSL certificate with LETSENCRYPT_STAGING_MODE = 0
Now that everything looks good, we can now go ahead and request a real SSL certificate!
First, shut down all OPQ Cloud services by changing into the opq-docker directory and invoking docker-compose down.
Then, open the opq-docker/config/nginx/nginx.env file and set the LETSENCRYPT_STAGING_MODE variable to 0.
The file should now look something like this:
NGINX_SERVER_NAME=emilia.ics.hawaii.edu
LETSENCRYPT_EMAIL=admin@openpowerquality.org
LETSENCRYPT_STAGING_MODE=0
Finally, invoke the init-letsencrypt.sh script and follow the prompts. The output should be nearly identical to
that of the test run that was performed earlier:
opquser@emilia:~/opq-docker$ ./init-letsencrypt.sh
Existing data found for emilia.ics.hawaii.edu. Continue and replace existing certificate? (y/N) y
### Creating dummy certificate for emilia.ics.hawaii.edu ...
WARNING: The NGINX_SERVER_NAME variable is not set. Defaulting to a blank string.
Creating network "opq-docker_default" with the default driver
Creating opq-docker_boxupdateserver_1 ... done
Creating opq-mongo                    ... done
Creating opq-docker_view_1            ... done
Creating opq-docker_nginx_1           ... done
Generating a RSA private key
.............................................+++++
............................+++++
writing new private key to '/etc/letsencrypt/live/emilia.ics.hawaii.edu/privkey.pem'
-----

### Starting nginx ...
WARNING: The NGINX_SERVER_NAME variable is not set. Defaulting to a blank string.
Stopping opq-docker_view_1            ... done
Stopping opq-mongo                    ... done
Stopping opq-docker_boxupdateserver_1 ... done
Removing opq-docker_nginx_1           ... done
Removing opq-docker_view_1            ... done
Removing opq-mongo                    ... done
Removing opq-docker_boxupdateserver_1 ... done
Removing network opq-docker_default
Creating network "opq-docker_default" with the default driver
Creating opq-docker_boxupdateserver_1 ... done
Creating opq-mongo                    ... done
Creating opq-docker_view_1            ... done
Creating opq-docker_makai_1           ... done
Creating opq-docker_nginx_1           ... done
Creating opq-docker_mauka_1           ... done
Creating opq-docker_certbot_1         ... done
Creating opq-docker_health_1          ... done

### Deleting dummy certificate for emilia.ics.hawaii.edu ...
Starting opq-docker_boxupdateserver_1 ... done
Starting opq-mongo                    ... done
Starting opq-docker_view_1            ... done
Starting opq-docker_nginx_1           ... done

### Requesting Let's Encrypt certificate for emilia.ics.hawaii.edu ...
Starting opq-docker_boxupdateserver_1 ... done
Starting opq-mongo                    ... done
Starting opq-docker_view_1            ... done
Starting opq-docker_nginx_1           ... done
Saving debug log to /var/log/letsencrypt/letsencrypt.log
Plugins selected: Authenticator webroot, Installer None
Obtaining a new certificate

IMPORTANT NOTES:
 - Congratulations! Your certificate and chain have been saved at:
   /etc/letsencrypt/live/emilia.ics.hawaii.edu/fullchain.pem
   Your key file has been saved at:
   /etc/letsencrypt/live/emilia.ics.hawaii.edu/privkey.pem
   Your cert will expire on 2019-06-29. To obtain a new or tweaked
   version of this certificate in the future, simply run certbot
   again. To non-interactively renew *all* of your certificates, run
   "certbot renew"
 - If you like Certbot, please consider supporting our work by:

   Donating to ISRG / Let's Encrypt:   https://letsencrypt.org/donate
   Donating to EFF:                    https://eff.org/donate-le


### Reloading nginx ...
2019/03/31 22:03:14 [notice] 10#10: signal process started
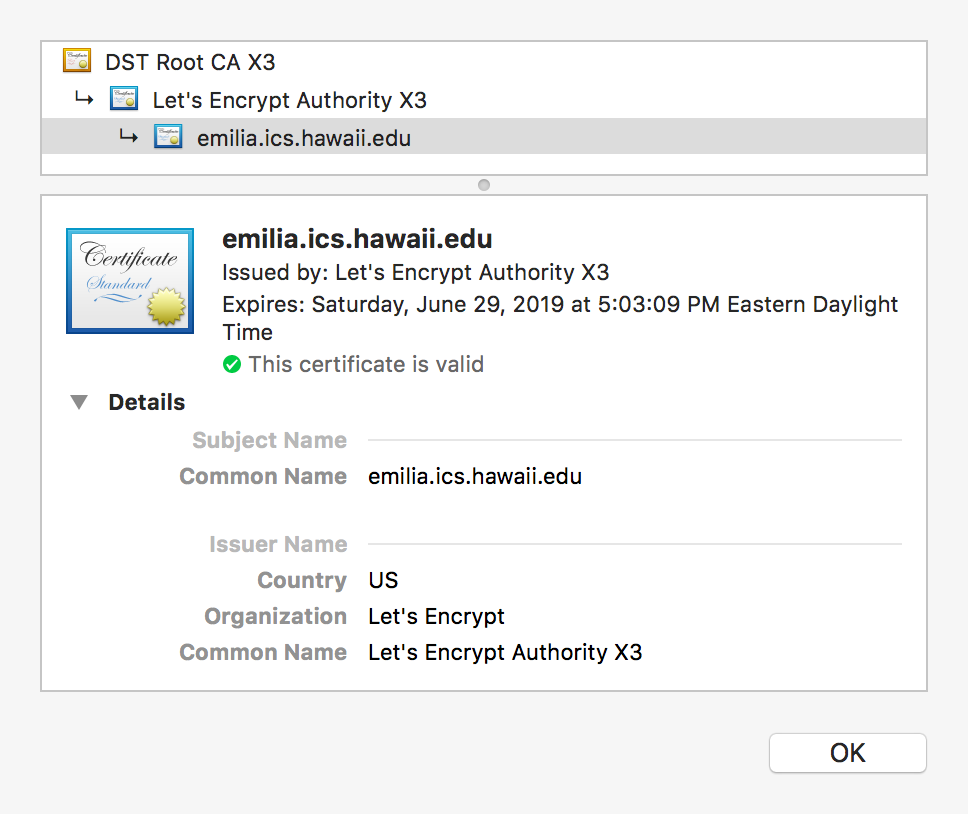
Verify that the SSL certificate was properly generated by opening up your web browser and visiting the View application at the domain name that you specified. On Chrome, it should look similar to this:
You're done!
Managing the installation
Bring all services down
If you need to bring all services down for any reason, just change into the top-level directory (where the docker-compose.yml file is), and invoke docker-compose down:
$ docker-compose down
Stopping opq-docker_health_1          ... done
Stopping opq-docker_view_1            ... done
Stopping opq-docker_mauka_1           ... done
Stopping opq-docker_makai_1           ... done
Stopping opq-docker_boxupdateserver_1 ... done
Stopping opq-docker_mongo_1           ... done
Removing opq-docker_health_1          ... done
Removing opq-docker_view_1            ... done
Removing opq-docker_mauka_1           ... done
Removing opq-docker_makai_1           ... done
Removing opq-docker_boxupdateserver_1 ... done
Removing opq-docker_mongo_1           ... done
Removing network opq-docker_default
Bring all services up
To bring all services up, just invoke the docker-compose-run.sh script:
$ ./docker-compose-run.sh
Creating network "opq-docker_default" with the default driver
Creating opq-docker_mongo_1           ... done
Creating opq-docker_boxupdateserver_1 ... done
Creating opq-docker_view_1            ... done
Creating opq-docker_makai_1           ... done
Creating opq-docker_mauka_1           ... done
Creating opq-docker_health_1          ... done
Update a single service
We will occasionally make new releases of OPQ Cloud services.
If you installed OPQ Cloud by git cloning the official OPQ Docker GitHub repository, updating is a trivial process:
On your production system, change into the opq-docker directory and pull the latest files by invoking:
git pull origin master
Then, redeploy OPQ Cloud with the latest changes by invoking the docker-compose-run.sh script:
./docker-compose-run.sh
Note that we did not have to shut down the currently running OPQ Cloud instance - in most cases, it should not be necessary at all.
When invoking the docker-compose-run.sh script, Docker Compose detects the differences between the previous and new OPQ Cloud configuration files and only redeploys the necessary services.
For example, after pulling the latest changes from the official OPQ Docker GitHub repository - in which the only change was a new version of the official OPQ View image, the resulting re-deployment output looks like:
$ ./docker-compose-run.sh
opq-docker_mongo_1 is up-to-date
opq-docker_boxupdateserver_1 is up-to-date
opq-docker_makai_1 is up-to-date
Recreating opq-docker_view_1 ... done
opq-docker_mauka_1 is up-to-date
opq-docker_health_1 is up-to-date
Prune containers and images
As noted in the Docker chapter on prune unused Docker objects, when you install new Docker images, the old ones are not automatically deleted. Over time, unused and out of date Docker objects can consume significant amounts of disk space.
To determine if you have unused Docker containers, you can run the docker ps -a command, which lists both running and stopped containers. Here is a sample run of that command:
$ docker ps -a
CONTAINER ID        IMAGE                                      COMMAND                  CREATED             STATUS              PORTS                                                                                                                                                                       NAMES
a14bc92c53a1        openpowerquality/health:1.0.1              "python3 -u health.py"   3 hours ago         Up 3 hours                                                                                                                                                                                      opq-docker_health_1
714ce76b75bb        openpowerquality/mauka:1.0.7               "python3 mauka/opq_m…"   3 hours ago         Up 3 hours          8911/tcp, 9881/tcp, 9884/tcp, 0.0.0.0:9882-9883->9882-9883/tcp, 9899/tcp, 0.0.0.0:12000->12000/tcp                                                                          opq-docker_mauka_1
c9044a3a2089        certbot/certbot                            "/bin/sh -c 'trap ex…"   3 days ago          Up 3 days           80/tcp, 443/tcp                                                                                                                                                             opq-docker_certbot_1
95e159b49a64        nginx:1.15-alpine                          "/bin/sh -c 'while :…"   3 days ago          Up 3 days           0.0.0.0:80->80/tcp, 0.0.0.0:443->443/tcp                                                                                                                                    opq-docker_nginx_1
402fe9b16200        openpowerquality/makai:1.0.6               "/bin/bash /build/bi…"   3 days ago          Up 13 hours         0.0.0.0:8194->8194/tcp, 0.0.0.0:8196->8196/tcp, 127.0.0.1:8080->8080/tcp, 127.0.0.1:9884->9884/tcp, 127.0.0.1:9899->9899/tcp, 0.0.0.0:9880-9881->9880-9881/tcp, 10000/tcp   opq-docker_makai_1
741fe724f9ac        openpowerquality/view:1.0.1                "node main.js"           3 days ago          Up 3 days           80/tcp, 0.0.0.0:8888->8888/tcp                                                                                                                                              opq-docker_view_1
00e9a674810e        mongo:4.0.5                                "docker-entrypoint.s…"   3 days ago          Up 3 days           127.0.0.1:27017->27017/tcp                                                                                                                                                  opq-mongo
e1cc09f69510        openpowerquality/box-update-server:1.0.3   "python3 box_update_…"   3 days ago          Up 3 days           0.0.0.0:8151->8151/tcp                                                                                                                                                      opq-docker_boxupdateserver_1
In this sample output, all containers are current and running. Should you discover stopped and out-of-date containers, you can run the following commands to get rid of both out of date containers and images.
To prune containers:
$ docker container prune
WARNING! This will remove all stopped containers.
Are you sure you want to continue? [y/N] y
Total reclaimed space: 0B
To prune images:
$ docker image prune -a
  WARNING! This will remove all images without at least one container associated to them.
  Are you sure you want to continue? [y/N] y
  Deleted Images:
  untagged: mongo:latest
  untagged: mongo@sha256:c4fe6705e1dffb91d3fdb4f2c00f58a5ce9b82dd010bce33e250d320518047b5
  deleted: sha256:a3abd47e8d61c923dd1561ad3720af4d948627c524a53d321c2a5bd6f6467060
  deleted: sha256:9c04aae8ecf33b57edf8893881b42d7483a4ef19e871ed9687fbe40468ede99e
  deleted: sha256:eb8c65e58c7f29789466d3d88b4961b98a4674bb0b892745d22cda11c8ce79b2
  deleted: sha256:be8087eddc5150dbd849a4ba7870ddf01125130e0b4f700a363f0b079553fa64
  deleted: sha256:11aedb0b4e679e62bf96e59f340326e1360a135d8efa175995887b352a3e7c72
  deleted: sha256:16c92c73bea3b0bca3eb887fdc1d482b7dbcb22173ca7633500824ff8f450a4c
  deleted: sha256:cc571f11735ac3eb1391d97eecde319c979871d7f9ab1272e588254d63ab41d1
  deleted: sha256:436cc613f90228becea77f76af6dfea10ac293f5d6951fbf73b6356dc0a53a21
  deleted: sha256:d21986d83085adfcefa2b12d347e14eebab64baec1caa2febfdc4f2e58e6a9c5
  deleted: sha256:d9b3c6372b7ebde73497fbde28baddcf487883c53a1a2a053c94131b98235800
  deleted: sha256:59a6856f439d187f3ce3381d0a6b0816db99cc3d8468bcf8c9d1c39d2071dcff
  deleted: sha256:82997a16a0d57ac7d8b416c0d83f5841193b6a56a7844b486ab6324730867fe0
  deleted: sha256:5c6983f277f26021b5e38501fdf06fa29f7158a93641f3f10aedbdc9869121d0
  deleted: sha256:aa54c2bc12290df2851a94b8834cae75e4627219d2b423d4d3db8b0a497e79a2
  untagged: bak-mongo:latest

  Total reclaimed space: 394.4MB
List container names
docker_names is a script (defined in system-utils.sh) that lists the (long) names of all active containers:
$ docker_names
opq-docker_health_1
opq-docker_certbot_1
opq-docker_nginx_1
opq-docker_view_1
opq-docker_mauka_1
opq-docker_makai_1
opq-mongo
opq-docker_boxupdateserver_1
Print container log
Use docker_log with a "short service name" (i.e. health, certbot, nginx, view, mauka, makai, mongo, boxupdateserver) to get its logs:
$ docker_log view
Starting cron job to update health status every 10 seconds.
Starting Hourly Notification Cron to check for undelivered notifications every hour
Starting Daily Notification Cron to check for notifications every day at 6AM.
Starting Hourly Notification Cron to find notifications older than 48 hours
Starting cron job to update system stats every 59 seconds.
Grep container log
User docker_grep with a short service name (see above) to print the log with the grep string highlighted:
$ docker_grep view "Daily"
Starting cron job to update health status every 10 seconds.
Starting Hourly Notification Cron to check for undelivered notifications every hour
Starting **Daily** Notification Cron to check for notifications every day at 6AM.
Starting Hourly Notification Cron to find notifications older than 48 hours
Starting cron job to update system stats every 59 seconds.