
Server Migration
This page documents the steps required for migrating an existing OPQ Cloud installation to a new server.
Prerequisites
- A fresh installation of Red Hat Enterprise Linux v7.6
- An initial user account with root/sudo access
Cloud Software Management
Instead of creating a single development account for managing software, we instead make use of Linux groups and the filesystem to provide software management access.
Add users
For each person accessing the system, add a new user.
For each user, make sure they belong to the wheel group for sudo access.
sudo usermod -a -G wheel $user
Note: If your system administrator already assigned user accounts, you can skip this step.
Create and join opqdev group
Create a new group called opqdev. This group provides read/write/execute permissions to OPQ Cloud software on the file system.
sudo groupadd opqdev
For each user, make sure they belong to the opqdev group.
sudo usermod -a -G opqdev $user
Create OPQ Cloud Software Location
Next, we need a place on the filesystem where all users in the group opqdev can access and manage the OPQ Cloud installation. We chose /var/opq. Once the directory is created, we then provide read/write/execute access to the directory and subdirectories. When/if you copy new files into /var/opq you may need to re-run these commands to update permissions on those items.
sudo mkdir -p /var/opq
sudo chgrp -R opqdev /var/opq
sudo chmod -R g+rwx /var/opq
Install System Dependencies
There are a few system dependencies that are required for setting up OPQ Cloud. These include git, docker, and docker-compose.
First, make sure the server is fully up-to-date.
sudo yum upgrade
Next, install git so that we can clone the opq-docker repo in a later step.
sudo yum install git
Install docker: https://docs.docker.com/install/linux/docker-ce/centos/
Install docker-compose: https://docs.docker.com/compose/install/
Follow the docker post-installation steps: https://docs.docker.com/install/linux/linux-postinstall/
Start the docker daemon and set it to auto-start on system boot.
sudo systemctl start docker
sudo systemctl enable docker
Finally, perform a sanity check with docker run hello-world.
Install OPQ Cloud
Next, either clone the opq-docker repository or copy your previous opq-docker deployment into /var/opq.
git clone https://github.com/openpowerquality/opq-docker.git
If you copy a previous deployment, make sure you update permissions with sudo chmod -R g+rwx /var/opq.
Restore MongoDB
Now that the opq-docker files are in place, let's restore the previous database which was backed up using the instructions at https://openpowerquality.org/docs/cloud-mongodb.html#making-a-backup .
First, we need to edit the directory structure and place the backup in a specific directory to be restored from.
sudo mkdir /var/opq/bak
Copy your backup to the new server so that is at /var/opq/bak/opq.dump.YYYY-MM-DD.bak.
Ensure the permissions: sudo chmod -R g+rwx /var/opq/bak
Start up only the mongodb docker image.
First, copy the file opq-docker/docker-compose-run.sh to opq-docker/docker-compose-run-mongo.sh.
Next, edit the last line of opq-docker/docker-compose-run-mongo.sh so that it resembles docker-compose up -d --remove-orphans mongo.
Run the new script to bring up only the mongodb docker image: ./docker-compose-run-mongo.sh and verify that it is up by running docker ps.
Finally, perform the restoration of the MongoDB backup by following instructions at https://openpowerquality.org/docs/cloud-mongodb.html#restoring-a-backup
At this time, you may wish to install a mongo client locally on the server to verify that the contents of the database have been restored correctly.
Update Configs and Required Directories/Files
Update Makai
Makai requires a special private key to provide encryption to OPQ Boxes. First, create a directory to hold the key:
sudo mkdir -p /etc/opq/curve/private_keys
Copy into this new directory the opqserver_secret file from the previous installation.
Set permissions so that this can only be read and written by root:
sudo chown -R root /etc/opq/curve
sudo chmod -R 551 /etc/opq/curve
sudo chmod 440 /etc/opq/curve/private_keys/opqserver_secret
Update box-update-server
Create the directory /var/opq/box-updates.
mkdir -p /var/opq/box-updates
This directory is used to store updates for OPQ Boxes read by the box-update-server docker service. See https://openpowerquality.org/docs/cloud-box-update-server.html for more information.
Update nginx and Let's Encrypt
In order for nginx to properly forward connections, we need to update its config to point to the new server's host name.
Edit the file opq-docker/config/nginx/nginx.env.
Change the key NGINX_SERVER_NAME to point to your new host name.
Change the key LETSENCRYPT_EMAIL to the main system administrator of your new OPQ Cloud deployment. The following is
an example of opq-docker/config/nginx/nginx.env after we updated it for our new host name.
# Required for Nginx's server_name directive (in app.conf.template), as well as View's ROOT_URL env var.
# Also used by the init-letsencrypt.sh script for setting up SSL certs for https.
NGINX_SERVER_NAME=ics02.colo.hawaii.edu

# Used by the init-letsencrypt.sh script for setting up SSL certs for https.
# It is recommended to set a valid email address when requesting a certificate from LetsEncrypt.
# Set LETSENCRYPT_STAGING_MODE to 1 while testing your setup to avoid hitting cert request limits. Set it back to 0
# when you are ready to request real certificates.
LETSENCRYPT_EMAIL=aghalarp@hawaii.edu
LETSENCRYPT_STAGING_MODE=0
Update the two server_name keys in opq-docker/data/nginx/app.conf to point to your new host name.
An example of this file after we migrated is provided below.
upstream view_app {
    server view:8888;
}

upstream boxupdateserver_health_server {
    server boxupdateserver:8151;
}

map $http_upgrade $connection_upgrade {
    default upgrade;
    ''      close;
}

server {
    listen 80;
    server_name ics02.colo.hawaii.edu;
    server_tokens off;

    location /.well-known/acme-challenge/ {
        root /var/www/certbot;
    }

    location / {
        return 301 https://$host$request_uri;
    }
}

server {
    listen 443 ssl;
    server_name ics02.colo.hawaii.edu;
    server_tokens off;

    ssl_certificate /etc/letsencrypt/live/ics02.colo.hawaii.edu/fullchain.pem;
    ssl_certificate_key /etc/letsencrypt/live/ics02.colo.hawaii.edu/privkey.pem;
    include /etc/letsencrypt/options-ssl-nginx.conf;
    ssl_dhparam /etc/letsencrypt/ssl-dhparams.pem;
    ssl_stapling on;
    ssl_stapling_verify on;

    client_max_body_size 10M;

    # View Proxy
    location / {
        proxy_pass  http://view_app/;
        proxy_http_version 1.1;
        proxy_set_header Upgrade $http_upgrade;
        proxy_set_header Connection $connection_upgrade;
        proxy_set_header Host $http_host;

        proxy_set_header X-Real-IP $remote_addr;
        proxy_set_header X-Forwarded-For $proxy_add_x_forwarded_for;
        proxy_set_header X-Forward-Proto $scheme;
        proxy_set_header X-Nginx-Proxy true;

        proxy_redirect off;

        proxy_connect_timeout 43200s;
        proxy_read_timeout    43200s;
        proxy_send_timeout    43200s;
    }

    # Box Updater Server Proxy
    location /box-update-server/ {
        proxy_pass  http://boxupdateserver_health_server/;
        proxy_redirect ~^/(.*) http://$http_host/box-update-server/$1;
        proxy_http_version 1.1;
        proxy_set_header Host $http_host;

        proxy_set_header X-Real-IP $remote_addr;
        proxy_set_header X-Forwarded-For $proxy_add_x_forwarded_for;
        proxy_set_header X-Forward-Proto $scheme;
        proxy_set_header X-Nginx-Proxy true;
    }
}
Update Health
Edit the file at opq-docker/config/health/health.config.json. Update the service with name mongo to match the following:
{
      "name": "mongo",
      "url": "http://localhost:28420"
},
Update the view service config with the new host:
{
      "name": "view",
      "url": "https://ics02.colo.hawaii.edu/health"
},
The following is an example of our health config after migration:
{
  "interval": 20,
  "mongo_host": "mongo",
  "mongo_port": 27017,
  "mongo_service_checker_addr": "0.0.0.0:28420",
  "services": [
    {
      "name": "mongo",
      "url": "http://localhost:28420"
    },
    {
      "name": "view",
      "url": "https://ics02.colo.hawaii.edu/health"
    },
    {
      "name": "makai",
      "url": "http://makai:8080"
    },
    {
      "name": "mauka",
      "url": "http://mauka:8911"
    }
  ]
}
Initialize Lets Encrypt
First, if you've copied over opq-docker from a previous server, you need to clear the opq-docker/data/certbot directory.
rm -rf opq-docker/data/certbot/*
Next, run the script opq-docker/init-letsencrypt.sh
You should see a successful message about acquiring an HTTPS certificate from letsencrypt.
Start OPQ Cloud
Now that all of the configurations have been updated and the infrastructure put in place, you can start the rest of the OPQ Cloud system
cd /var/opq/opq-docker
docker-compose down
./docker-compose-run.sh
You can verify that all docker images are running with docker ps.
Update Deployed OPQ Boxes
Update Deployed OPQ Boxes w/ Physical Access
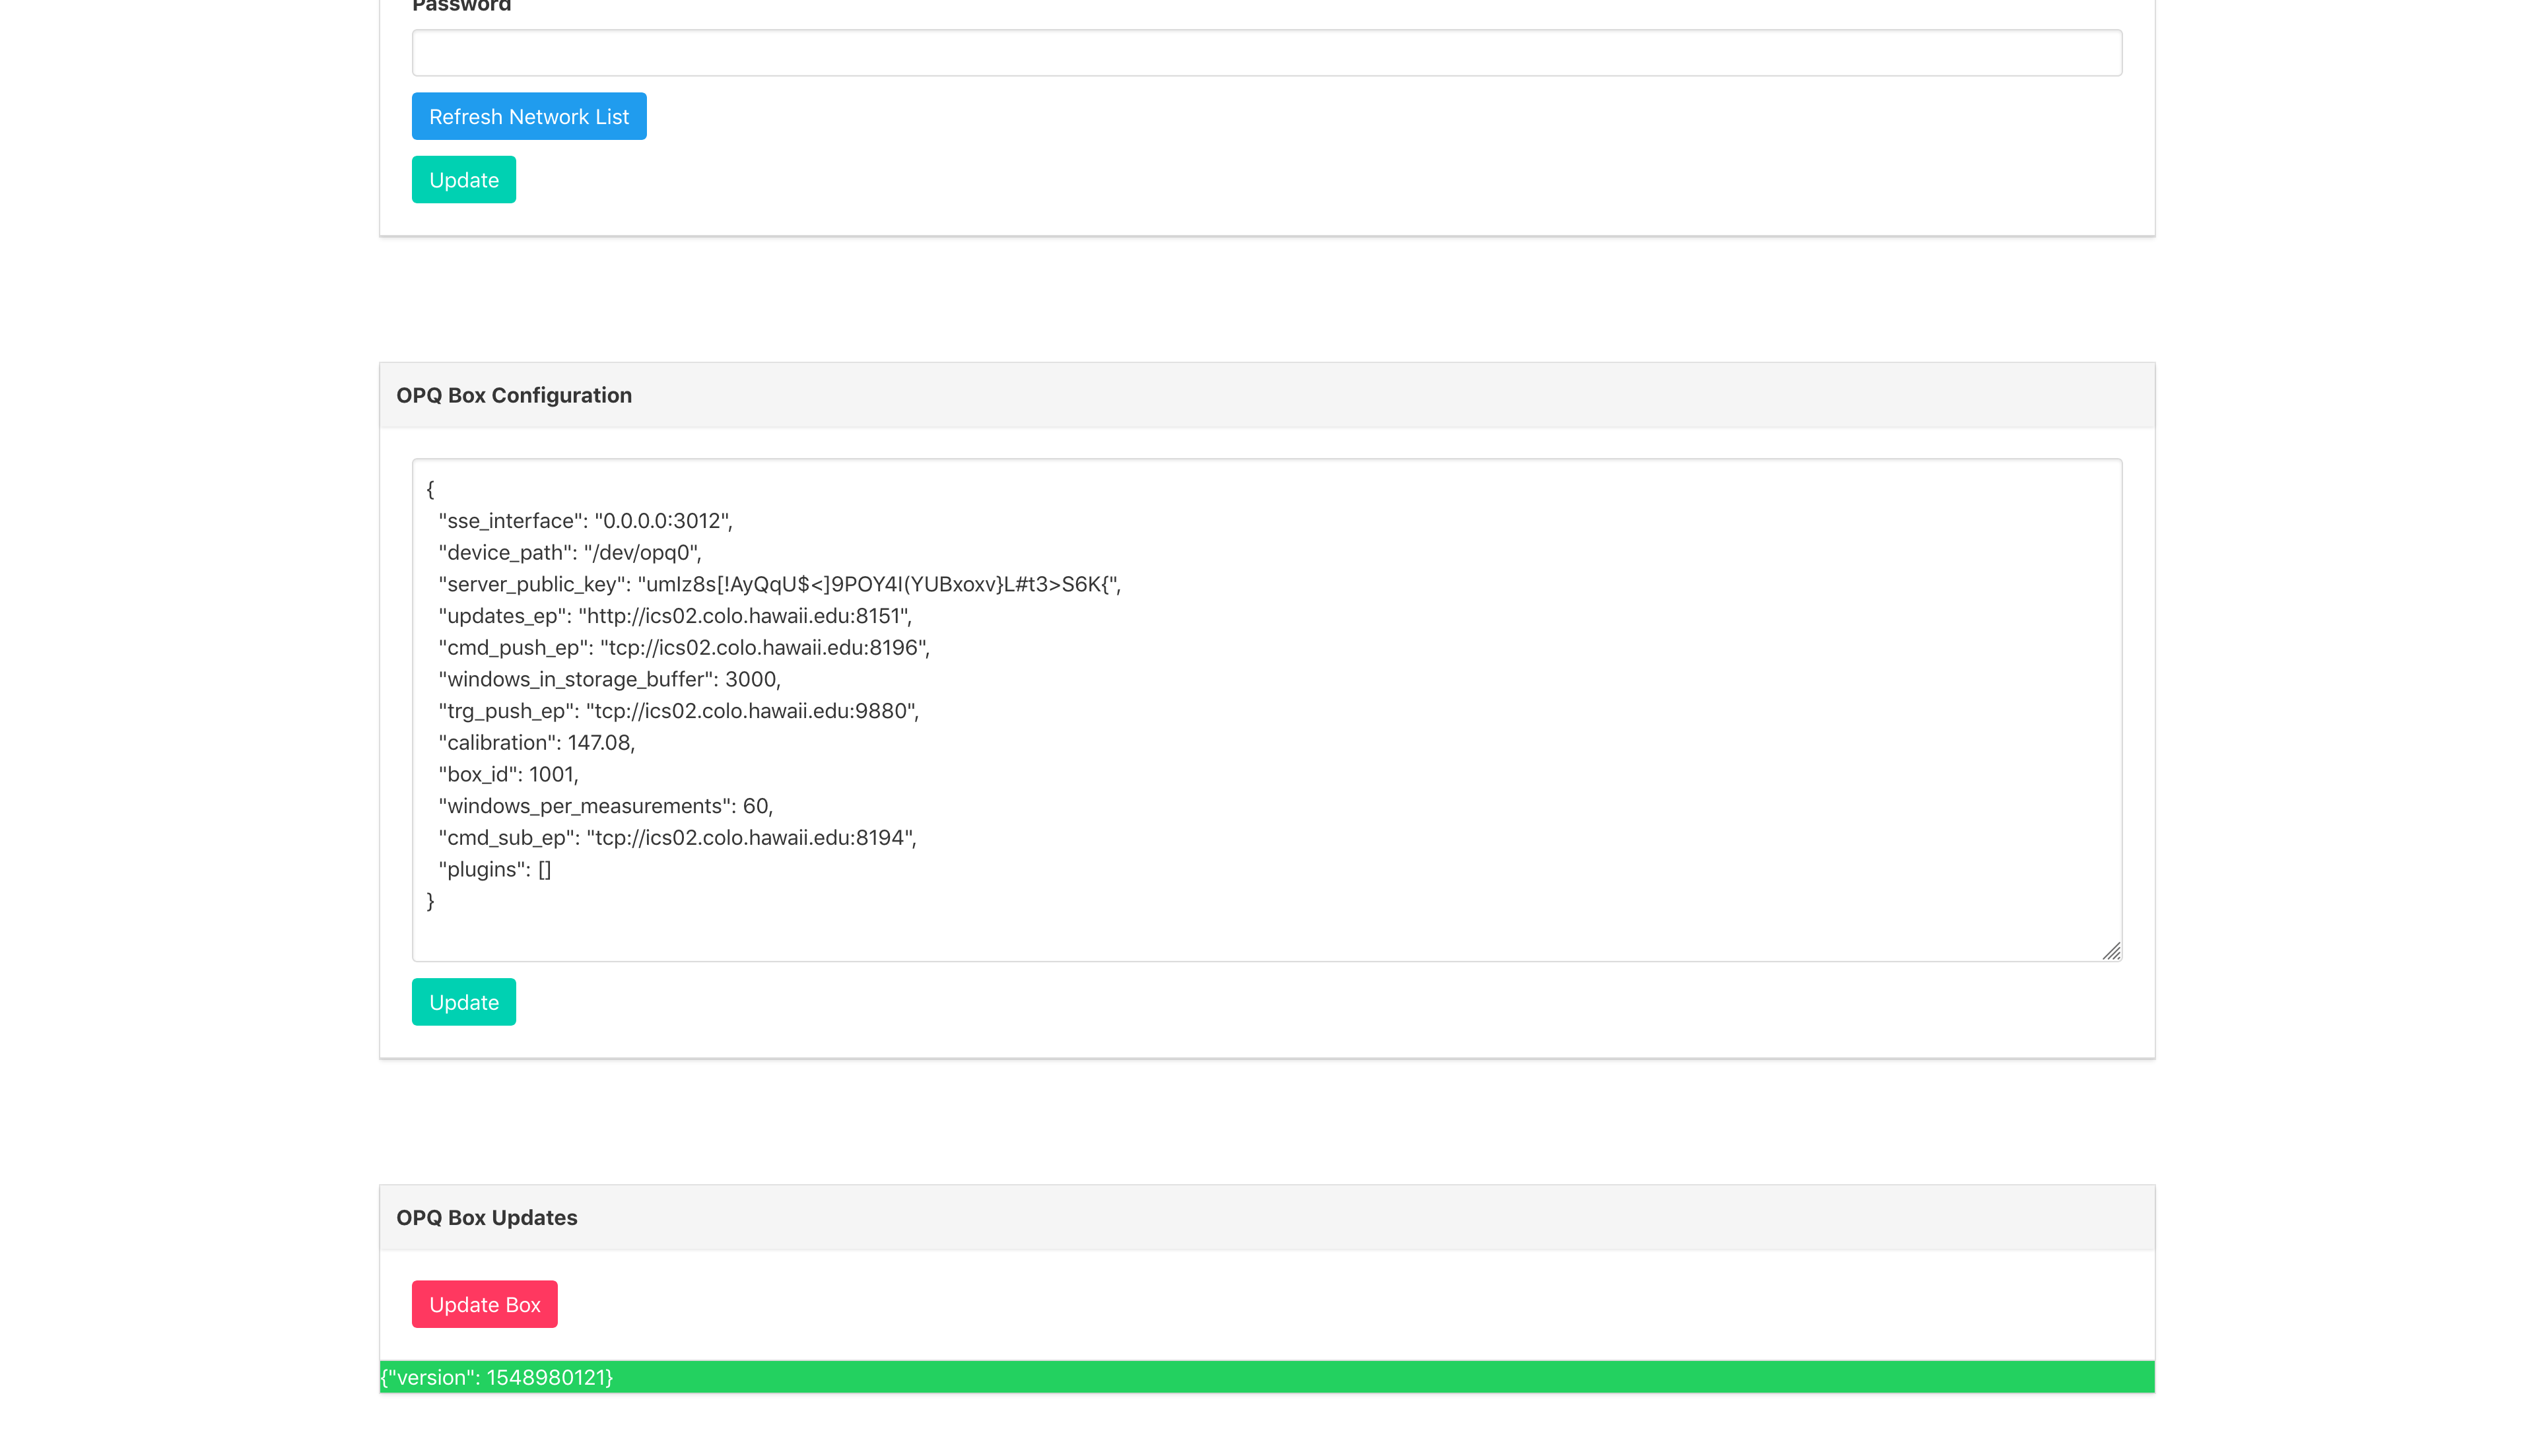
For each Box that you wish to update, visit the configuration daemon for that Box by opening your web browser and navigating to http://$box_ip_address:8888. Note: You need to be on the same network as the box to access it.
Scroll down to the bottom of the page where the Box configuration is displayed. Update the following configuration keys to point to the new server: updates_ep, cmd_sub_ep, trg_push_ep, and cmd_push_ep.
Once the endpoints have been updated, press the Update button.
Reboot the Box by unplugging it and plugging it back in.
The following image shows an example configuration after we migrated from emilia.ics.hawaii.edu to ics02.colo.hawaii.edu:
Update Deployed OPQ Boxes w/ Remote Access
For each Box that you wish to update, ssh into the box.
ssh pi@$box_ip_address
The password can be obtained from an OPQ administrator. Please contact us if you do not have the Box password.
Then, use vim to edit the Box config file.
sudo vim /etc/opq/opqbox_config.json
Change the endpoints for the following keys to match the endpoint of the new server: updates_ep, cmd_sub_ep, trg_push_ep, and cmd_push_ep.
An example of the configuration file after moving servers from emilia.ics.hawaii.edu to ics02.colo.hawaii.edu follows:
{
  "box_id": 1001,
  "plugins": [],
  "calibration": 147.08,
  "windows_per_measurements": 60,
  "server_public_key": "umIz8s[!AyQqU$<]9POY4I(YUBxoxv}L#t3>S6K{",
  "updates_ep": "http://ics02.colo.hawaii.edu:8151",
  "cmd_sub_ep": "tcp://ics02.colo.hawaii.edu:8194",
  "device_path": "/dev/opq0",
  "sse_interface": "0.0.0.0:3012",
  "trg_push_ep": "tcp://ics02.colo.hawaii.edu:9880",
  "cmd_push_ep": "tcp://ics02.colo.hawaii.edu:8196",
  "windows_in_storage_buffer": 3000
}
Once the changes to the config file have been saved, reboot the box:
sudo reboot
Optional Installation Steps
Automated MongoDB Backups
You may want to setup MongoDB backups as described here: https://openpowerquality.org/docs/cloud-mongodb.html#automating-backups
Docker helper functions and aliases
There is a large list of docker functions and aliases for interacting with docker at https://github.com/openpowerquality/opq/blob/master/util/system/system-utils.sh .
Copy this file into each user's home directory at ~/system-utils.sh. Then, at the end of each user's ~/.bashrc file, add the line source system-utils.sh so that you can access these utilities from the command line.
Setup Public Key Authentication
On the server, generate a new key pair.
ssh-keygen -t rsa -b 4096
Then, for each user, copy the contents of their ~/.ssh/id_rsa.pub file into the server's ~/.ssh/authorized_keys file. If ~/.ssh/authorized_keys does not exist on the server, create it.
Test the Installation
If everything goes well, you should now be able to access OPQView at the new endpoint. In our case, you can navigate to https://ics02.colo.hawaii.edu .